Tuesday, March 15, 2011

Tiddly Tuesday! Challenge # 42 - Lucky Me

Good Morning Everyone!!!  I'm so glad to be here with you on another fabulous Tiddly Tuesday!!  Today's challenge is Lucky Me or Go Green - depending on your mood =)  This weeks challenge is to incorporate either a St. Patrick's Day or Love The Earth theme into your creation.

This week I created with Lucky Irish.  Isn't she BEAUTIFUL?  Christy never ceases to amaze me...truly. 

I colored my image with my Copics.  As you can see I paper pieced her lucky clover - twice.  Once for the background and again for the 3-D effect.  I colored and glittered up the clovers in her hair with SU! Supernova glitter.
I layered and stitched my background paper.  Added a bubbly row of scalloping and two sides of chunky bling.  I scooped up my sentiment stamp from the $ bin at ACM a few years ago.  

I do hope you come and join us on the Tiddly Inks challenge blog this week!!  I can't wait to see what you create!!

Just for fun I'm entering this into the following challenges!

Sentimental Sundays - Going Green
Cupcake Inspiration Challenge #102 - Shamrocks
Colour Create - Colour Challenge #66

Monday, March 14, 2011

Bugaboo Scallop Challenge!

We're all so busy.  Jobs, Kids, Errands, Life...it's just busy.  So when the opportunity comes along to create "just because", I grab hold of it!

Yesterday and today I've been working on this cutie pie Bugaboo Image 'Ava Easter' from the Ava and Deacon line.  

I printed Ava onto white cardstock and colored her with my Copics, my white gel pen and embellished her jumbo Easter egg with my Doodlebug glitter in Bumblebee.  I layered my main image with Fancy Pants DP and Navy Blue cardstock.  The pink polkadot paper is the reverse side of the light blue Fancy Pants DP that I've used for my background which I also backed with the Navy Blue cardstock.  


The challenge at Bugaboo is 'Scallops' so using my little half-moon/slit punch I created three scallop edges out of the Navy cardstock and front and back of the Fancy Pants paper.  I adhered them all together and using bright blue thread zipped that panel as well as my main and back panel through my sewing machine for a super fun finished touches.
I added PTI's - Lemon Tart 5/8" Grosgrain ribbon in a super yummy and bright bow on the left hand side.  

I LOVE how this came out and I can't wait for the next Bugaboo challenge!!  Oh and the gorgeous purple carnations?  Those are from my darling hubby =)  I thought they looked super cute in the photo!

I hope you have enjoyed and been inspired!!

Smeared Ink Monday - Got Eggs?

Greetings Everyone!!!  I'm here with you on another awesome Smeared Ink Monday!!  I'm feeling SO in the mood for spring that I had to bust out the grumpie lil' bunny from the Occasions Lil' Grumpies set.  Isn't she the cutest??  I laugh every time I see her!!

My bunny is inked with Momento Ink in Tuxedo Black and colored in with my Copics.  I paired my image with pinks and greens for spring along with sparkly bling and stitched ribbon.  I, of course, added some lime green stitching to my two main panels.

I am entering this creation into the pastel challenge at Stamping, Scrapping Challenge Central!  Wish me luck! =)

I hope you've enjoyed my simply cute creation today!!

Saturday, March 12, 2011

Tiddly Gothic Goodness!

Is there ANY better way to spend a Saturday than with new gorgeous images from Tiddly Inks???  I think not!!
Christy has been seriously hard at work to bring you six new Gothic Divas, sentiments and designer papers!! 

You must hit the Tiddly Inks blog to see the ridiculous gorgeousness that my fellow Design Team gals whipped up for you for super inspiration!!

My first creation uses Heartbroke Happy.  Isn't she BEAUTIFUL?? 
 My second creation showcases Made For You.   Isn't she a doll?  (hehe)  

You can pick up all of the newness at the shop!! 

I'm off to create!  Have a fabulous Saturday All!!  


Thursday, March 10, 2011

Smeared Ink Blog Hop!

Greetings All!!  Welcome to another amazing Smeared and Smudged Forum Blog Hop!!  First off, you should be coming here by way of  my friend Jane's blog.  If not please start here so you get to see all of the gorgeousness!!

Today's theme was to use a color palette of greens and browns.  I dove immediately into my paper stash and pulled out some super favorites.  My "most darlingist" friend Joanne is a constant source of inspiration for me and I couldn't help but be entirely motivated to make this fun and funky piece to hang over my newest craft space on the first floor of my house based on the gorgeous home decor she's been busting out lately. 

I went immediately towards the Inky Dreams set from Smeared Ink.  It's now a constant go to for me for focal points and backgrounds alike.

Using SU! Early Espresso, Tim Holtz - Peeled Paint, Ranger - Adirondack Earthtones - Lettuce and PTI's palette hybrid ink - Chartruse I was able to create super funky greens by mixing and layering my color.

I used my nesties to pull out my main focal images as well as my splotchy blops, inked on yellow polkadot paper (for a burst of color) then punched out with my circle punches and a giant, blingy flourish in the center for a super delicate touch.

I hope you have enjoyed and been inspired to create today!!

Please keep on hopping to Diane's blog!!!

Tuesday, March 8, 2011

Tiddly Tuesday!! Challenge #41 - Kraft With Me

Good Morning Everyone!!  Today's Tiddly Card is one of the most special cards I've made this year.  Today is my sweetie, darling, lovey and huggy son Tyler's 5th birthday.  Astounding, really.  He's just everything and more than we could ever expect him to be.  Sigh...he's just awesome.
So!  With that, I've made a very special card, using a very special image drawn by Christy per my request to have a tap dancing boy - this image is Ty The Tap Dancer.  My son LOVES to dance, takes dance lessons and is excelling at an incredible rate.  (not that I like to brag or anything ;) hehee...what Mom doesn't?  LOL!

This week's Challenge #41 is called Kraft With Me.  I kept my card super basic as I really wanted to focus on the image.  Plus, I wanted my son to be able to keep it on his nightstand (where he keeps special things) and to be able to hold it without a lot of "fussyness" all over it.

I printed Ty out and colored him with all of my newest Copic colors!  I stitched around the edge and using a Doodlebug acrylic stamp set, stamped the first part of my sentiment 'happy' in SU!'s Marina Mist ink.

I added two layers behind my main image - SU! Bashful Blue and a strip of vintage looking chart paper (can't remember whose it is).  I stitched both to make them pop and layered them behind Ty.  I then adhered everything down and tied a simple knot with blue and white gingham ribbon.


I decorated the interior using lots of scraps from one of my many scrap boxes.  I inked the rest of the Doodlebug sentiment and using the same SU! ink stamped on Kraft to make it coordinate with the rest of the card.  
One last shot of my creation along side my son's medal from his first ever dance recital.  He was so proud!!!  Happy Birthday Darling 5 Year Old Boy!!!

Please don't forget to come join us at the Tiddly Inks Challenge Blog to enter your Kraft Creation!!!  I can't wait to see you over there!!!


Monday, March 7, 2011

A Snuggly Smeared Ink Monday

Good Monday Morning!!
I'm here with you today with an sample from the altered photography class that I "taught" (posted) on the Smeared Ink Forum yesterday!!  I provide many techniques for altering the surface of a photograph.  Whether you are into scrapbooking, altered art, altered art journaling, photography, stamping, etc these techniques are super fun and force you to look at your photographs in a completely different light!

These techniques are also so fun for children to use on any photographs that are duplicates, fuzzy, etc to help teach them that art isn't just about paper and pencils, poster board, canvas, etc.  It really helps push their imaginations outside of the box!  (I wouldn't recommend the burning techniques with little ones - for obvious safety reasons) 

Please come check out my class on the Smeared Ink Forum

I hope you enjoy and have been inspired to try something totally new!!!


Tuesday, March 1, 2011

Simply Betty New Release and Blog Hop!!

Greetings everyone!!  Welcome to an amazingly fabulous and fun NEW IMAGE RELEASE Hop from Simply Betty Stamps!! 

May I introduce Victoria and her Gang!  SBS has a wonderful new artist.  Alicia Bel has created these fun and super sassy cuties for Simply Betty Stamps!!! (insert collective applauding and cheering here!! =)

First, if you came here via Linda's fabulous blog then you are on the right track!!!  If not, please start here!!  

I chose to work with Mary Jane today.  She jumped out at me when I first saw this new collection.  There's something just so cheeky yet sweet about her!!  I love her pigtails (I wear the same hairdo 85% of the time!).  Her dress is just too frilly and adorable and I love her makeup compact and brush!!!
 
I colored Mary Jane with my Copics.  Using my Nesties - Label 1 - I cut her out and backed her with light pink (the same pink I've used for my card base)

I used SU! Kraft cardstock followed by two American Girl designer papers.  Yes, they are my six year old daughters from a HUGE American Girl Mat Stack that I got her!  I figured I could snag a few ;)  I stitched around the edges of these layers with light pink thread.


I wanted 'something' in between my main layer and my background.  An elegant swirl was JUST the thing.  Problem was...I didn't have one!!  And it's pouring and icing rain here in the NE so I wasn't about to go zinging up to the store to grab one soooooooooo I improvised!!  I free hand drew my swirl and covered it with individual self-adhesive stones.  A lot of work but totally worth it!!


Based on how I'd drawn the swirl, left me with a round space in the lower left hand corner, which I promptly filled with a 1 1/4" punch using PTI's sentiment "love is all you need".  I added a button in the middle threaded with beautiful, vintage looking crocheted ribbon.

I LOVE how this cluster totally balances, compliments and completes the card.


Make sure you keep hopping along to Suzi's gorgeous blog so that you get to see everyone's amazing creations plus all of the awesome new images!!

Tiddly Inks Challenge #40 - Color Me

Good Morning Everyone!!!  I'm SO beyond excited to be bringing you another month of amazing challenges from Tiddly Inks!!! 

Today's challenge, #40, was SO fun for me!!!  The theme is "Color Me".  I started by choosing my image.  That's how I always work when using Digital Images.  

This week I chose to create with Everyday Princess.  Seriously?  Could she be ANY cuter???  I printed her out four times.  Once on good, white cardstock and then again on three different patterned papers - all from my six year old daughter's American Girl Doll paper pack collection!  It's so fun to share all of my crafting stuff with her and she gets SO excited when I come to her for stuff! 
 
I colored Princess with my Copics and then proceeded to paper piece her entire skirt all out of the three different patterned papers.  My darling husband sat and watched as I meticulously, using craft tweezers, trimmed and adhered each tiny piece of her skirt.  

Close up of her paper pieced skirt!
I stitched around my main image, added my PTI sentiment and two, blue, metallic rub-on birdies.  I glittered up her Princess Staff and set her aside to dry.
I kept my papers the same in the background as were used on her skirt.  I used a strip of yellow polkadotted paper that I created into a scallop to accent the left side of my main image.  I used super raspberry colored satin ribbon - intentionally frayed at the ends by me - to balance out the scalloping on the left. 
I do hope you've enjoyed and have been inspired by my creation today!!  Please come join us at the Tiddly Inks Challenge blog!!!  We can't wait to see what you create!!


Monday, February 28, 2011

Smeared Ink Monday - Skelly Chic!

Good Morning All!!  I hope everyone's had a great weekend!!
I was busy crafting and organizing all day yesterday.  So relaxing!  My card today uses a true mish mash of goodies that I found hanging around my craft table.  I used Smeared Ink's 'As Death' set, combined with a rustic color palette of chocolate and light browns, greens, blues and assorted neutrals.

I used my Cricut to cut oval in order to add extra dimension to my focal image of the skeleton.  I bundled a collection of vintagey chic yet messy grouping of pearls, rhinestones, stamped images, felt stickers and ribbon on the left hand side to compliment and balance my bold and large focal image. 
I hope you have enjoyed and been inspired by my creation today.  I really love the combination of the dark image yet the light and elegant balance of the clustered embellishments!


Thanks for popping by today!!  Come hang out with us on the SI forum!!  There is always something fabulous going on there!
 

Entering into the following challenges:


DYSU!  Challenge #8 Anything Goes
Southern Girls Challenge - Bling!

Friday, February 25, 2011

Simply Betty Challenge Friday!


Hi Everyone!!  Happy Friday from a FABULOUSLY snowy day here in the great state of Maine!!  Today's awesome Simply Betty Challenge is as follows:  Your creation can be ANYTHING but must use an Emo Christian image... Christmas, Everyday, Halloweenie, anything Christian! Pretty simple!

Betty is offering up an AMAZING prize to the winner of this week's challenge!  One lucky winner, will be chosen to help us release our next line! The winner will be the very first aside from Betty and the Design Team, of course, to see the new line.  You will get to choose two digital images from the new line to help us debut them on March 15th! It is an "Egg"-citing one! You won't be disappointed! So pull out those Christians and get to creating!

Good luck, have fun and please make sure link your creation here by March 3rd at 10pm PST. 
 
Here is my Christian creation for today!!  I printed Back To School Christian and colored him with my Copics and Prisma markers.  I kept my card design simple and in boyish hues of green, blues and browns.  I used my Tim Holtz notebook paper embossing folder for my blue cardstock that I then edged in TH Vintage Photo ink.  
I used my Nesties in Label 1 for my PTI sentiment.  I used brown and blue striped ribbon and a piece of gold flecked gimp tied in a knot for my simple embellishments.  

I hope you have enjoyed and been inspired to join our challenge!!!


Crafty Hugs!!
Meredith

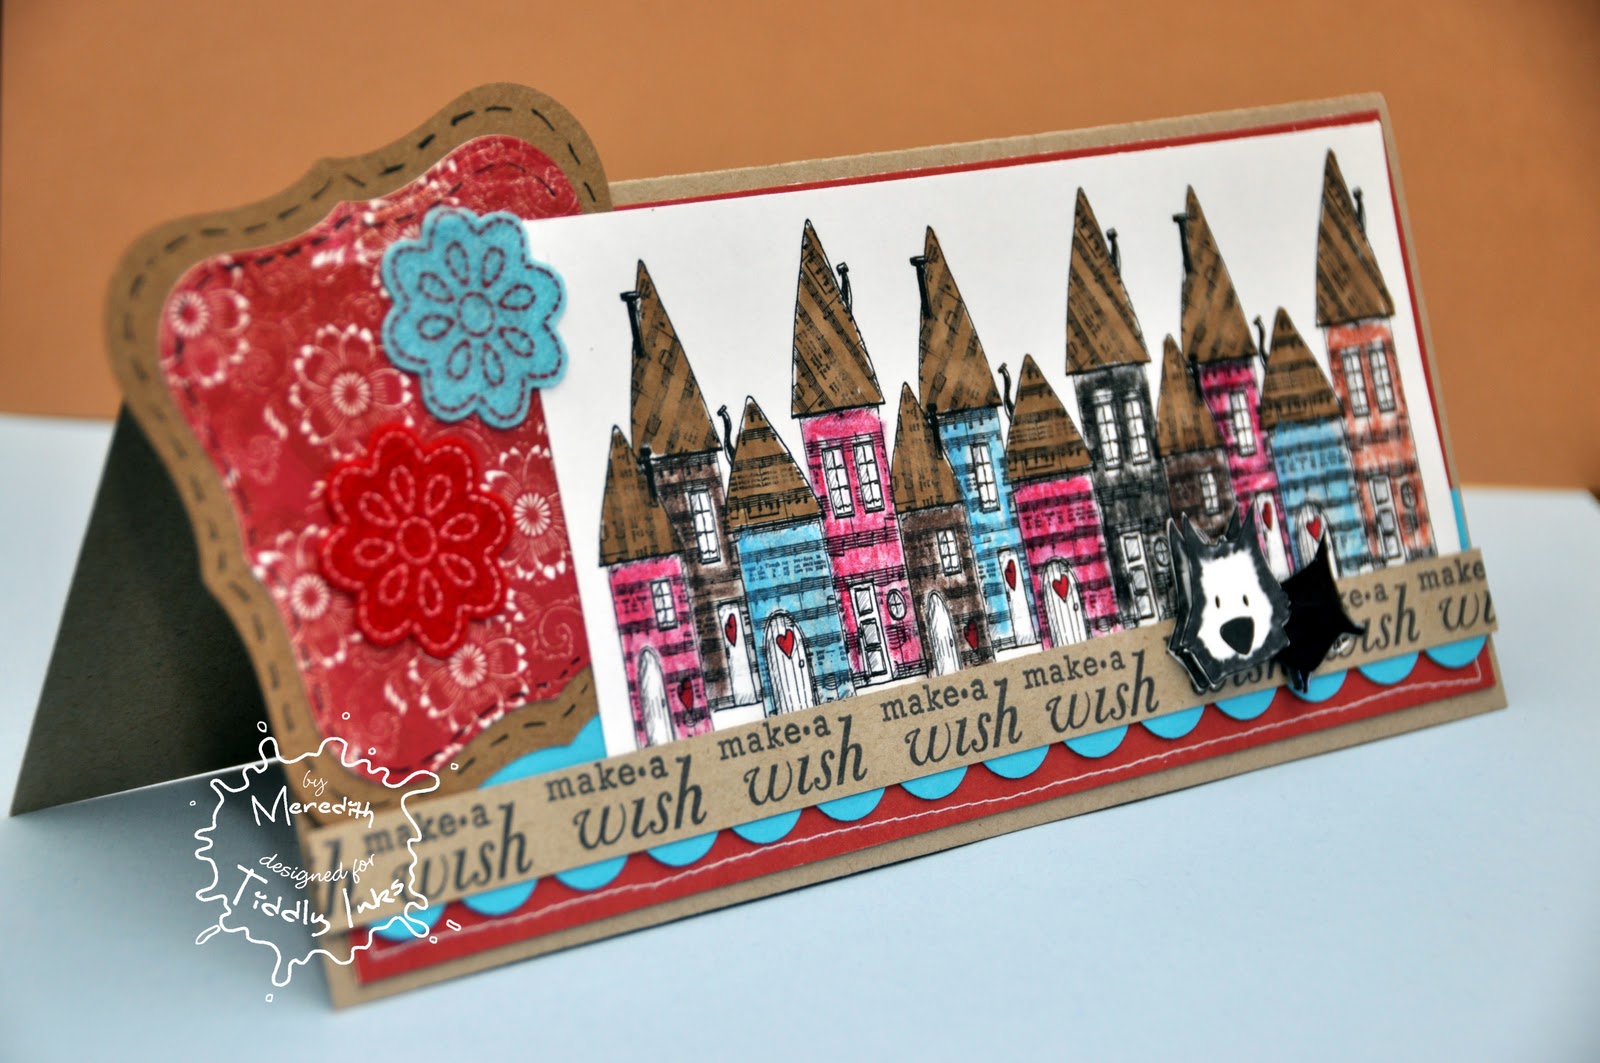
Fabulous Friday with Tiddly Inks!!


Happy Friday Everyone!!  I'm so enjoying time off with my family and our wonderful friends.  It's been a wonderful February break vacation week!!  

I made my Fabulous Inky Friday card with my Father In Law in mind.  His birthday just passed and hopefully this card has been in his hand for a few days now!  =) 

I made a long card as I wanted to encompass the Harmony at Home image as well as the new What's up (or Down) image.  I was originally going to keep the balloons on the What's Up image but for layout purposes I snipped them off. 
My cardbase is 9.25"x4".  I chose SU!'s Close To Cocoa.  I followed it up with My Mind's Eye brand cardstock, which is red on one side with the complimenting side showing in white flowers with a rustic feel to them.  

I colored the houses in the Harmony image with my Prisma pencils and Copic markers.  I kept my pencil coloring intentionally 'scruffy', if you will, so that I could have a watercolor"ish" look going on.  I used my paper blender and Burt's Bees Apricot Oil to blend my pencil.  It looks so pretty and smells DELICIOUS!  =)  

I created a scalloped border to snug in along the bottom right under my sentiment strip.  I used PTI's Mixed Mega Messages to create this.  I started in the middle with my first stamp and worked my way going left then right all the way out to the edges.  This way I was ensuring that my placement would be even and clean and not end up with more or less space between each image.  

Using my Nesties and Big Shot, I cut out two decorative labels.  I adhered them together, ran edging of faux stitching around them with a great drawing pen and finished that section off with two Martha Stewart wintery felt stickers.
As a final touch, I added the sweet What's Up puppy.  My In-Laws are Scottie people.  I knew that I had to incorporate him somehow!!  I tried adding him with the balloons as noted above but it just didn't fit right.  So I snipped them off, colored the puppy in black, coated him with Diamond Glaze and set him aside overnight.  I colored a second puppy that I'd printed out and trimmed his head off.  
When I came back in the morning, I added a pop dot to the back of puppy two and added him to my now dried and glazed up pooch.  I'm sorry but he's SO cute, if I do say so myself!!  LOL!


I hope you have enjoyed and been inspired today!!!  Please don't forget to swing by the TI Challenge Blog to check out the fabulous inspiration that is up on display!!

Crafty Hugs!
Meredith